This wikiHow article will walk you through installing or upgrading to Windows 10 on any PC. To start the Windows install or upgrade process, you need to configure your computer to boot from a CD or DVD before booting to the hard drive. Changing the boot process forces the computer to look for the Windows installation disc before booting from the hard drive.
Press it till the light inside the case will change from black to white. Wait until the light inside starts blinking white. It is important that both of the Airpods are in the case and are charging. You should see the light start to blink white. Make sure to put your AirPods back in the case and close its lid for the safety and performance of your AirPods. As you saw, connecting the AirPods to a Windows 10 PC is the same as connecting any other Bluetooth devices to your Windows 10 system.
Installing software on your Windows PC
The following steps are the same as if you install via direct download. If you only have a Windows 10 ISO file, it is not required to use a USB flash drive or disc to continue with the installation. You can always mount the ISO in File Explorer to launch a clean install or in-place upgrade on a device with the operating system already installed.
- There are different answers for this question.
- Hold down the option key immediately after restarting your Mac.
- Insert your installation media into your device and then access the computer’s BIOS or UEFI.
- There are a few common reasons why your AirPods say “paired but not connected,” including incorrect device pairing or an incompatible Bluetooth connection.
When you’re all set to do it, you should have some basic idea about the gadget, and here it goes. Connecting an AirPods to any of the compatible iPhones or Apple devices is a breeze, and some call it a magical thing to do. As in the majority of wireless headphones available in the market, the same, well-known Bluetooth is in use for these products too. However, the process needs to be particularly handled, and it may not resemble the usual technique for connecting a wireless gadget to the Windows computer.
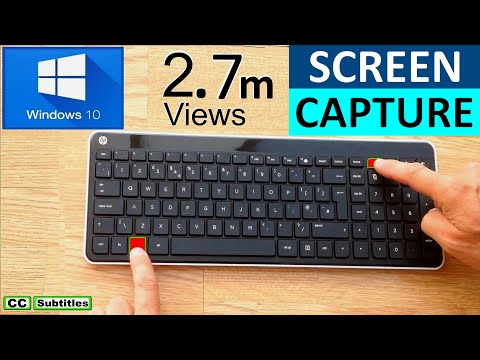
The Print Screen button varies from keyboard to keyboard, but is usually placed somewhere between F12 and the “Scroll Lock” button. Copy the screenshot to your clipboard without saving it. Though based on meticulous research, the information we share does not constitute legal or professional advice or forecast, and click this should not be treated as such. Reproduction in whole or in part is strictly prohibited.
Perform Windows + Print Screen keys
Run the Snipping Tool in Windows by any of your favorite methods and click the New button. Enter your email address below to receive your promo code and stay up to date on the latest tech news and updates. HelloTech editors choose the products and services we write about. When you buy through our links, we may earn a commission.
If this is proving tricky, the tips inour guide to freeing up space in Windows 10 could be useful. If there are files you don’t need immediately, it’s worth backing them up and then performing a factory reset. You can then choose what you want back on your PC at a later date. Next, connect a blank USB flash drive to your computer and launch WinToUSB from its Start menu shortcut. At the introductory screen, click the search button next to the Image File field and choose the ISO file you created for Windows 10 or 11. Download the Windows media creation tool and create an installer on your USB drive.